GetCourse processes used to send information about a subscriber and the type of action to perform on them to Bothelp.
Such actions do not depend on the bot logic in BotHelp and the subscriber's current position in the bot. Therefore, they can be performed at any time directly from the process in GetCourse.
The action will be performed for users who are already subscribers to the required channel in BotHelp and passed to GetCourse.
More details on how to transfer a subscriber to GetCourse:
List of available actions
- Add a tag to the subscriber.
- Remove tag from subscriber.
- Change the value of a subscriber custom field.
- Add a subscriber to the auto-mailing list.
- Remove subscriber from auto-mailing.
- Add a subscriber to the bot at a specific step.
- Remove subscriber from bot (stop bot for subscriber).
Let's create a process using the example of a task where you need to tag subscribers who have certain paid offers for further segmentation.
Creating a process on GetCourse
1. Create a process
- Go to the "Tasks" - "Processes" section and click on the Create process .
- Name the process "Passing Tags to BotHelp".
- Select the object type "Orders".
- Template "without template".
- Click the Create .
2. General settings
- In the "Bulk task creation" section, select "Periodic check".
Periodic check does not set tasks immediately, but within 5-15 minutes. - If the process is completed or paid, in the object entry rules, specify and select the offer on the basis of which the marks will be placed. You can add several offers.
- Click "Save"
Example:
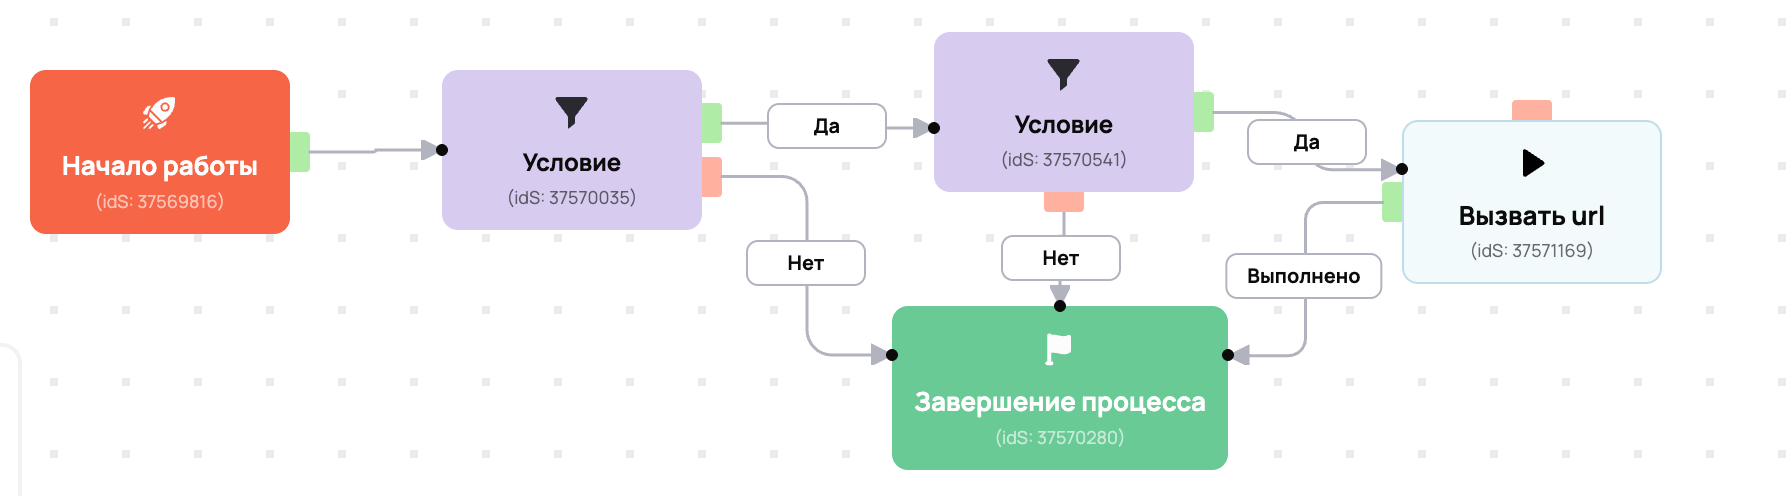
3. Creating a process
After the general settings, you need to go to the "Process" tab and add the "Condition" block
- Condition "Order created"
This condition "Order" - "Offer" - your offer, upon occurrence of which you need to transfer the mark. You can add several offers through the condition " or " .
If the condition is not met (no), then we move to the completion of the process.
- Block "Process Termination"
Add a Positive "Process Completion" block and connect the failure to meet the order creation condition with the completion of the process.
- Condition "Order paid"
- Add the condition "Order" - "Paid" - "Yes".
- Combine the conditions "Order created" and "Order paid".
- If the condition is not met (no), switch to "End process".
- If the condition is met (yes), move to the “Operation” block — “Call URL”.
- Block Operation - Call URL
Add a new block of the Operation type, select Call URL and save.
In the "Operations" settings, specify:
- Operation name: "Transfer Label".
- Method "POST".
- In the URL field, enter the link that you will generate according to list of links for action
In our example:https://gc.bothelp.io?domain_name=onlineschool&token=12345b242e1ec47878a3751f9f78a8e737d09567696b24b0a123456789999&email={object.user.email}&phone={object.user.phone}&actions[add_tag]=BuyerMyTrain
4. Leave the rest as default. Save.
- Don't forget to specify all connections correctly.
Connect the successful execution of the "Order paid" condition with the "Operations" block of the ID transfer.
Connect the Operations block to the Process Termination block.
Make sure your process flow exactly matches the screenshot.
Start the process and make sure it is active.

List of links for action
To set up all actions, you will need BotHelp SecretKey, and for individual actions - Step Ref, Bot Ref and Auto-distribution Ref. Instructions on where and how to get this data will be below ↓
Important! To identify a BotHelp subscriber by their CUID, instead of the fields email={object.user.email}&phone={object.user.phone}, you need to write idBotHelp={object.user.bothelp_id} .
the instructions on how to do this .
- Add a tag to the subscriber [add_tag].
- This action adds the specified label to the selected BotHelp subscriber.
- Important! A tag with this name must already be created in your BotHelp account. Otherwise, it will not be added to the selected subscriber.
- Important! It is not recommended to use Cyrillic and special characters (!, ?, #, etc.) in the label name. For the link to work correctly, such label names must be encoded, an example is here . Insert the already encoded value into the link. If the label name is in English, encoding is not required.
https://gc.bothelp.io?domain_name={%Your domain in Bothelp%}&token={%Your SecretKey from the BotHelp account%}&email={object.user.email}&phone={object.user.phone}&actions[add_tag]={%Label name from the BotHelp account%}
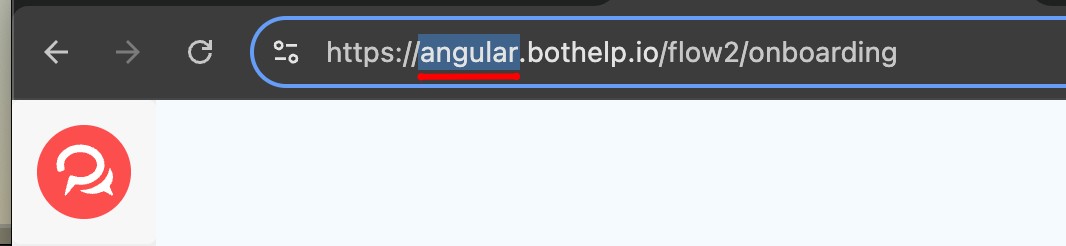
1. {%Your domain in Bothelp%} = account name
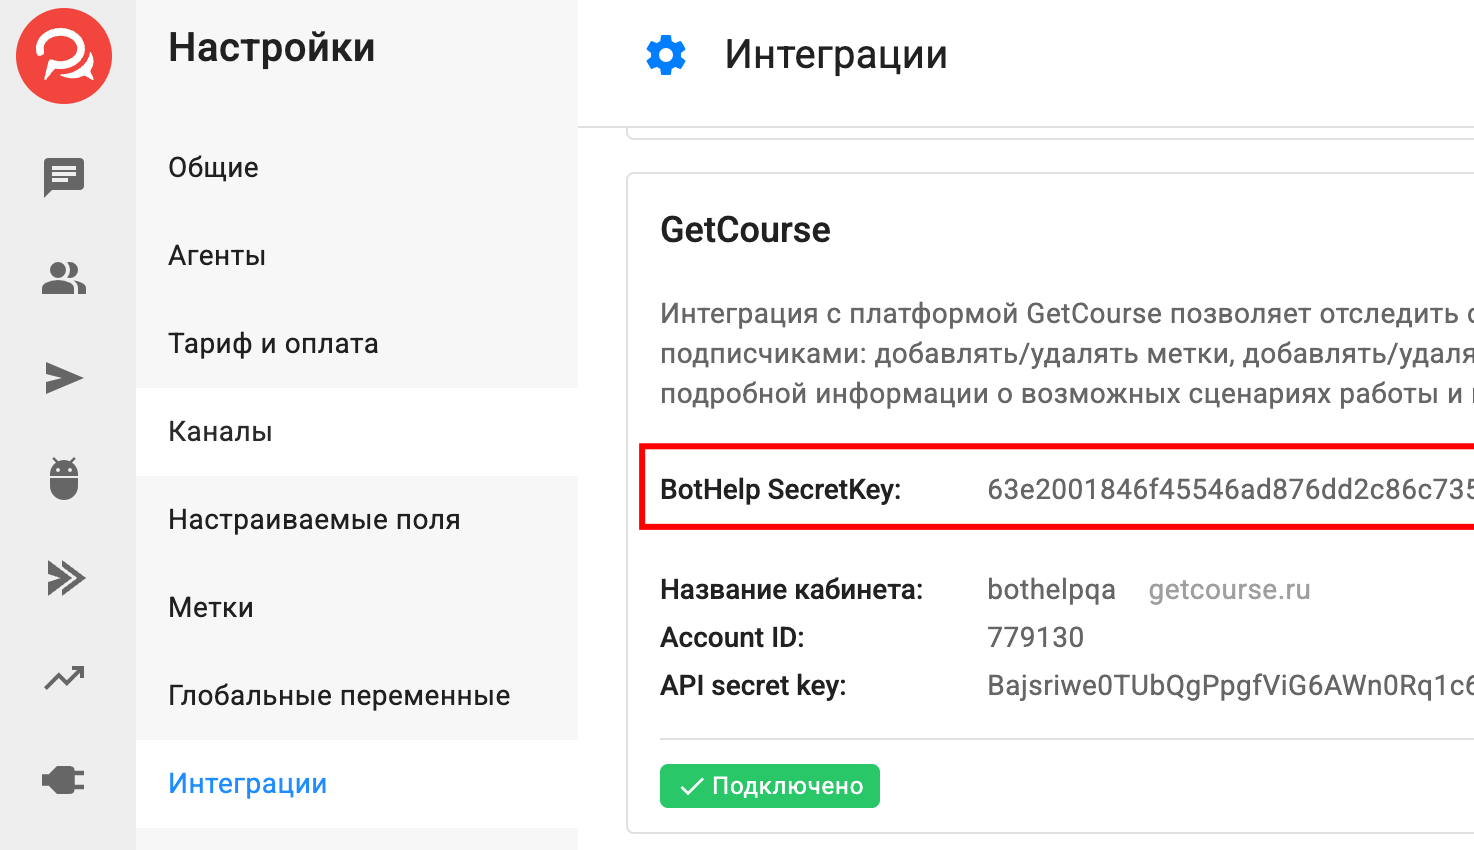
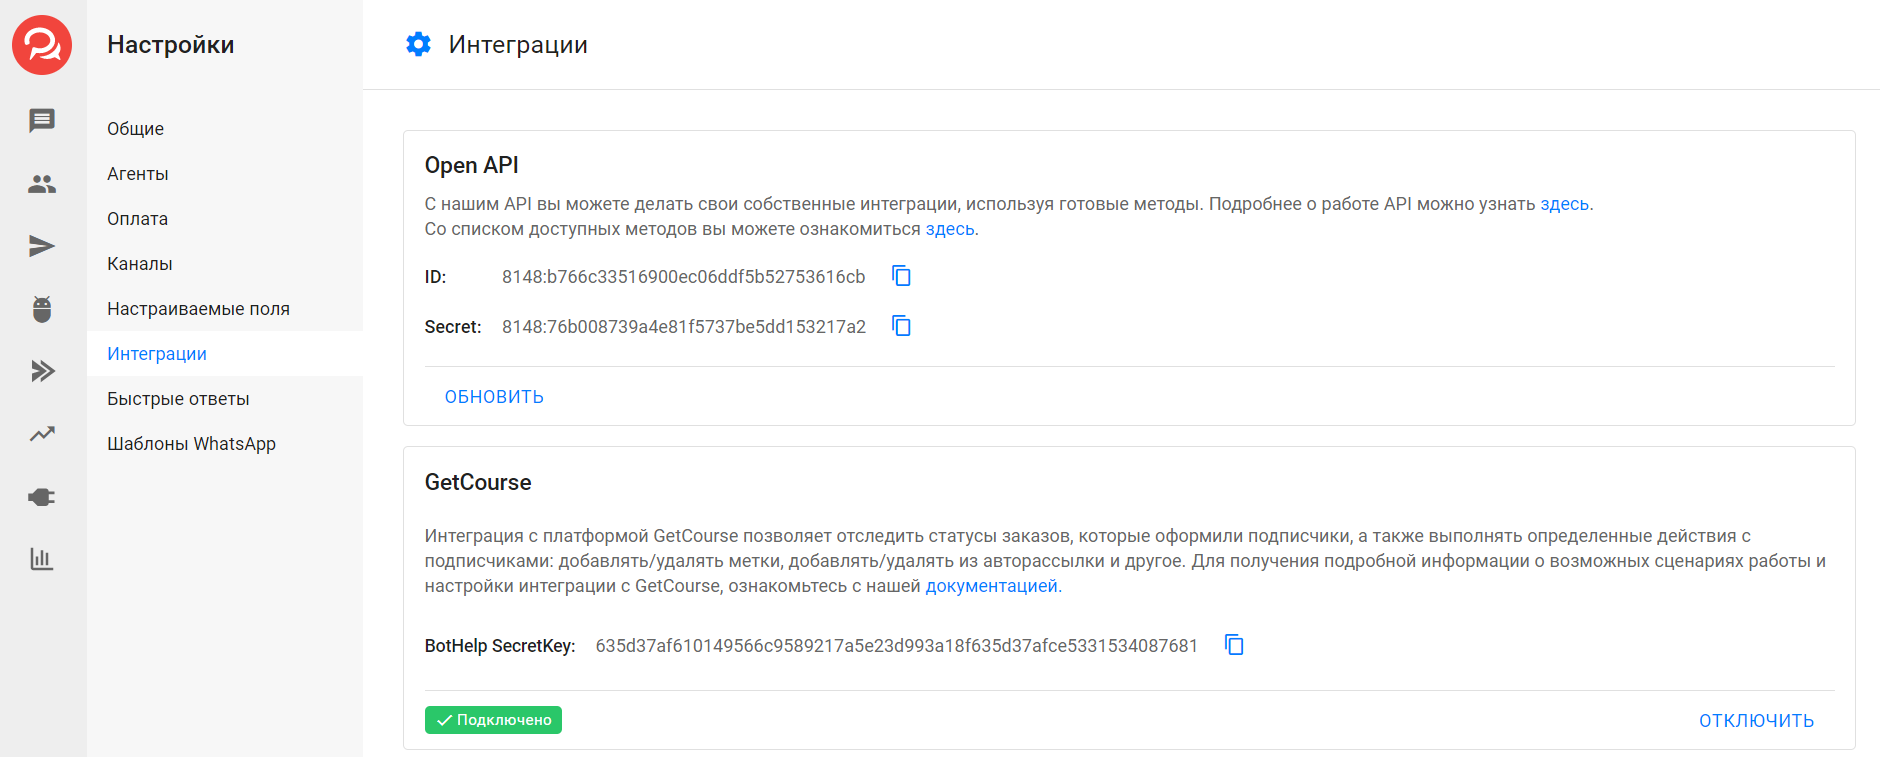
2. {%Your SecretKey from the BotHelp account%} = Key in the "Settings" section, "Integrations", block with GetCourse
Example of a ready link:
https://gc.bothelp.io?domain_name=onlineschool&token=12345b242e1ec47878a3751f9f78a8e737d09567696b24b0a123456789999&email={object.user.email}&phone={object.user.phone}&actions[add_tag]=BuyerMyTrain
- Delete tag from subscriber [del_tag].
- This action removes the specified label from the selected BotHelp subscriber.
It is not recommended to use Cyrillic and special characters (!, ?, #, etc.) in the label name.
- This action removes the specified label from the selected BotHelp subscriber.
https://gc.bothelp.io?domain_name={%Your domain in Bothelp%}&token={%Your SecretKey from the BotHelp account%}&email={object.user.email}&phone={object.user.phone}&actions[del_tag]={%Label name from the BotHelp account%}
- Change the value of a subscriber custom field [set_field].
- This action sets a new value in the specified field for the selected BotHelp subscriber.
In the name and value of the field, as well as for labels, it is not recommended to use Cyrillic and special characters (!, ?, # and others). You can read about encoding methods above ↑
- This action sets a new value in the specified field for the selected BotHelp subscriber.
https://gc.bothelp.io?domain_name={%Your domain in Bothelp%}&token={%Your SecretKey from the BotHelp account%}&email={object.user.email}&phone={object.user.phone}&actions[set_field]={%Field name%}&actions[set_field_value]={%Field value%}
- Add subscriber to auto-mailing [add_to_funnel].
- This action adds the selected BotHelp subscriber to the specified auto-mailing list.
- To determine which auto-mailing list to add a subscriber to, you need to specify its Ref in the link instead of the text
{%Ref of your auto-mailing list%}. How to get the Ref of an auto-mailing list - find out in the instructions below ↓
https://gc.bothelp.io?domain_name={%Your domain in Bothelp%}&token={%Your SecretKey from the BotHelp account%}&email={object.user.email}&phone={object.user.phone}&actions[add_to_funnel]={%Ref of your auto-distribution%}
- Remove subscriber from auto-mailing [remove_from_funnel].
- Performing this action removes the selected BotHelp subscriber from the specified auto-list. The subscriber will no longer receive messages from this auto-list.
- To determine the auto-mailing from which you need to remove a subscriber, you need to specify its Ref in the link instead of the text
{%Ref of your auto-mailing%}. How to get the Ref of the auto-mailing - find out in the instructions below ↓
https://gc.bothelp.io?domain_name={%Your domain in Bothelp%}&token={%Your SecretKey from the BotHelp account%}&email={object.user.email}&phone={object.user.phone}&actions[remove_from_funnel]={%Ref of your auto-distribution%}
- Add a subscriber to the bot at a specific step [run_bot].
- This action adds the selected BotHelp subscriber to the specified multi-step bot at a specific bot step.
- To determine the bot and step where you need to add a subscriber, in the link for both specify Ref instead of the text
{%Ref of your bot%}and{%Ref of your bot's step%}. How to get the Ref of the bot and its step - see the instructions below ↓ - If you do not add a field for the Ref step to the link, then for the subscriber the bot will start by default from the first step "Start".
- If you specify an incorrect step Ref in the link (for example, the step was deleted), then for the subscriber the bot will start from the first step "Start" by default. We recommend making a note in the step name in the bot that this step is involved in the integration.
https://gc.bothelp.io?domain_name={%Your domain in Bothelp%}&token={%Your SecretKey from BotHelp account%}&email={object.user.email}&phone={object.user.phone}&actions[run_bot]={%Ref of your bot%}&actions[step_ref]={%Ref of your bot step%}
- Remove subscriber from bot (stop bot for subscriber) [stop_bot].
- This action removes the selected BotHelp subscriber from the multi-step bot. The bot stops working only for this subscriber.
- To determine which bot to remove a subscriber from, you must specify its Ref in the link instead of the text
{%Ref of your bot%}. How to get the bot's Ref - see the instructions below ↓
https://gc.bothelp.io?domain_name={%Your domain in Bothelp%}&token={%Your SecretKey from BotHelp account%}&email={object.user.email}&phone={object.user.phone}&actions[stop_bot]={%Ref of your bot%}
What are these links for?
With these links, Getcourse sends subscriber and action type data so that BotHelp can perform the specified action on the selected subscriber.
The link contains the necessary data about the subscriber and the action:
- idBotHelp is a unique subscriber identifier in the BotHelp database, by which BotHelp finds a specific subscriber in its database. In the BotHelp account, in the subscriber card, this field is called CUID . It is mandatory when identifying a subscriber by CUID.
- domain_name — the name of your account in BotHelp. This field helps BotHelp understand in which account to look for a subscriber with such an email, and also compares it with the specified SecretKey (token). This is a required field.
- In the link in the domain_name parameter, instead of the text {%Your domain in Bothelp%}, you must specify the domain of your account in BotHelp. Curly brackets {} and % signs must be removed. The final entry will be in this format:
domain_name=mybhaccount.
- In the link in the domain_name parameter, instead of the text {%Your domain in Bothelp%}, you must specify the domain of your account in BotHelp. Curly brackets {} and % signs must be removed. The final entry will be in this format:
- BotHelp SecretKey/token — the secret key of your BotHelp account, which ensures the security of the integration. This is a required field.
- In the link in the token parameter, instead of the text {%Your SecretKey from the BotHelp account%}, you must specify the BotHelp SecretKey from the integration settings of your account. Curly brackets {} and % signs must be removed. The final entry will be in this format:
token=qwerty123456.
- In the link in the token parameter, instead of the text {%Your SecretKey from the BotHelp account%}, you must specify the BotHelp SecretKey from the integration settings of your account. Curly brackets {} and % signs must be removed. The final entry will be in this format:
- email — the subscriber's email. BotHelp uses it to find a specific subscriber in its database. This is a required field when identifying a subscriber by email.
- phone — subscriber's phone. BotHelp can also use it to find a specific subscriber in its database if there are several subscribers by email. This is an optional field.
- actions[] — parameter that specifies the type of action to perform on the subscriber. This is a required field
- In the link in the actions[] parameter, instead of the text {%Text depends on a specific action%}, you must specify the required value without curly brackets {} and % signs. The final record will be in the following format:
actions[add_tag]=metka(example for the action of adding a tag to a subscriber).
- In the link in the actions[] parameter, instead of the text {%Text depends on a specific action%}, you must specify the required value without curly brackets {} and % signs. The final record will be in the following format:
Important! There are two recording options for the email, phone and idBotHelp fields. The choice depends on the type of the configured process in GetCourse.
- For "Orders" processes:
email={object.user.email}&phone={object.user.phone}andidBotHelp={object.user.bothelp_id}. - For processes by "Users":
email={object.email}&phone={object.phone}andidBotHelp={object.bothelp_id}. - For more details, read instructions .
How to find out SecretKey (token) BotHelp
- Go to the "Settings" section in the navigation panel of your account.
- Open the Integrations tab.
- Find the GetCourse block and click the Add Integration .
- Copy the received BotHelp SecretKey - it needs to be pasted instead of the text
{%Your SecretKey from the BotHelp account%}in the links.
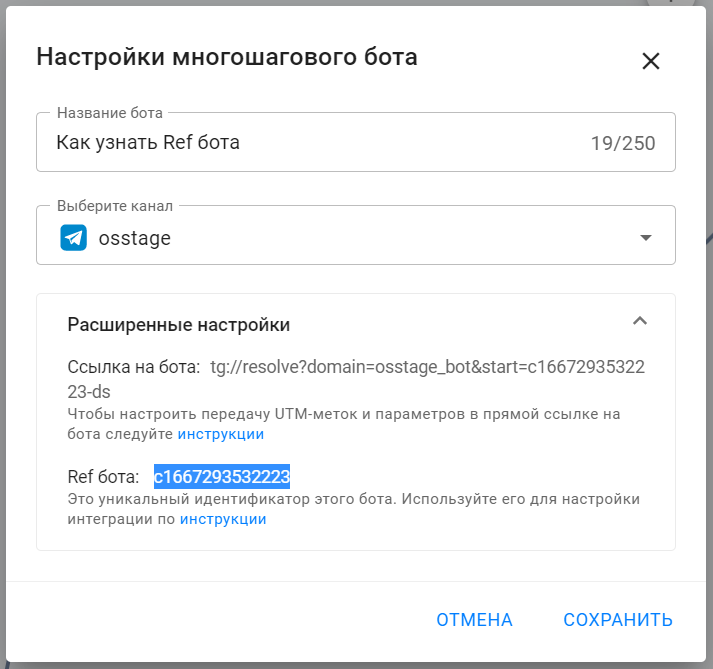
Where to find out Bot Ref and Step Ref
Bot ref
- Go to the "Bots" section in the navigation panel of your account.
- Open the desired bot.
- Click on the settings button "Gear" in the upper right corner.
- Click on the sub-item "Settings".
- In the window that opens, expand “Additional settings”.
- At the very bottom of the window that opens, find the field called “Bot Ref” - this is the bot identifier.
- Copy it, then paste it in place of the
{%Ref your bot%}in the links.
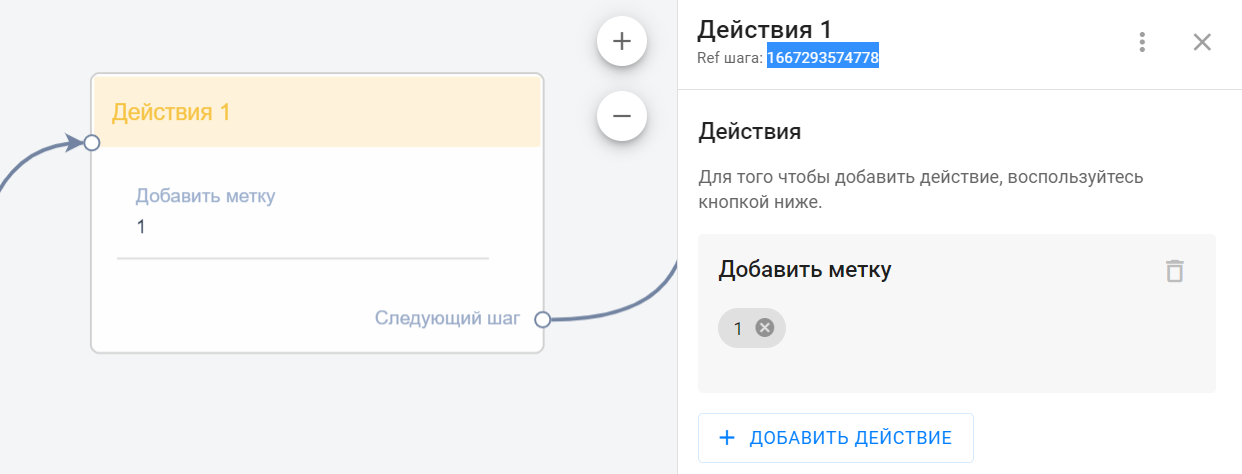
Step Ref:
- Go to the "Bots" section in the navigation panel of your account.
- Open the desired bot.
- Go to the bot editing mode by clicking on the Edit button in the upper right corner.
- Open the editing panel for the step you need.
- The step ref is displayed at the top of the panel under the step name - this is its identifier.
- Copy this ID - it needs to be pasted instead of the
{%Ref step of your bot%}in the links.
Where to find out the auto-referral Ref
- Create or open an existing auto-mailing list.
- Click on the Settings in the upper right corner.
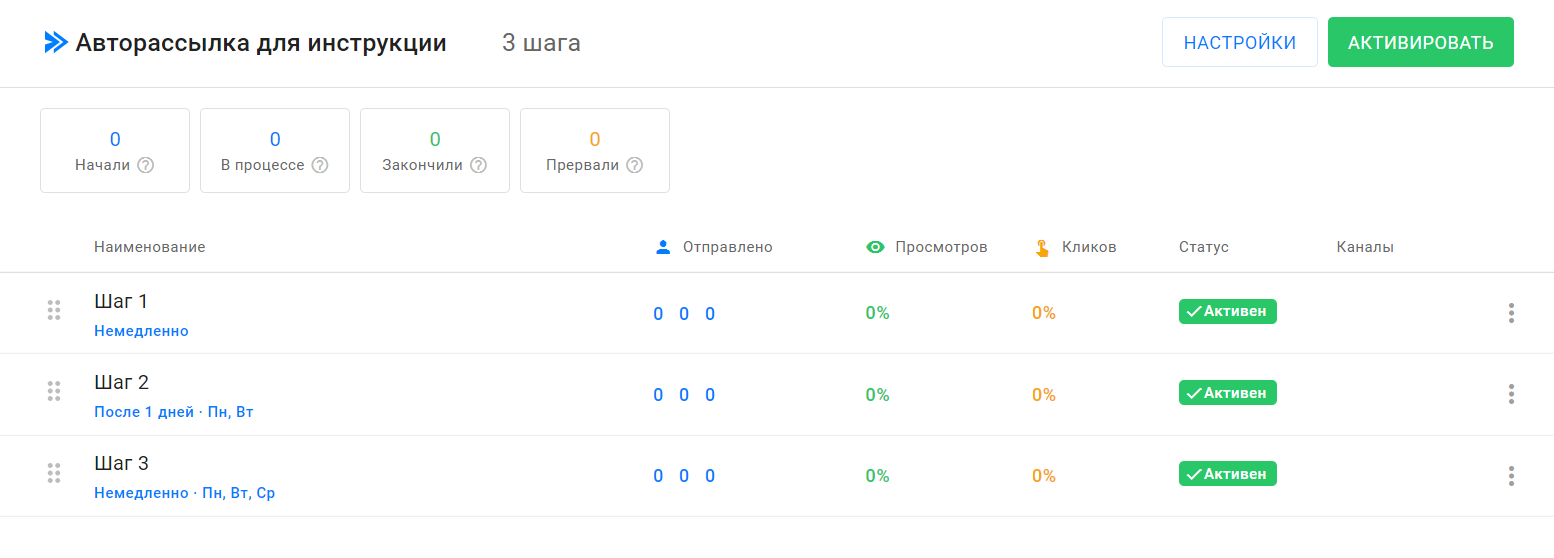
- At the very bottom of the window that opens, find the field called “Ref” - this is the auto-dispatch identifier.
- Copy it and paste it instead of the text
{%Ref of your auto-distribution%}in links.- The value to copy in our example is
f1667053874594.
- The value to copy in our example is

If you have not found the answer to your question, ask us in the chat inside your account or write to BotHelpSupportBot or to hello@bothelp.io
Get 14 days of full functionality of the platform for creating mailings, autofunnels and chatbots BotHelp.