With the help of integration and processes inside GetCourse, it is possible to send information about the subscriber and their order from GetCourse to BotHelp in order to interact with the subscriber via the bot.
General description of the scenario
The integration of GetCourse and BotHelp, configured according to this scenario, will allow you to automatically exclude subscribers from closed groups or chats in Telegram if they have not renewed their subscription in GetCourse.
Assumptions within this scenario
- The subscription is issued for a long period, so the configured process will be launched manually at the right time.
- We assume that the subscriber is already a member of a closed Telegram group and has previously paid for a subscription.
- In your GetCourse account, an offer for the first subscription has already been created, which prompted the subscriber to place an order.
The main stages of the process
- The deadline for paying for the next subscription to a closed chat/group in Telegram is approaching.
- For some reason, the subscriber does not renew the subscription.
- GetCourse runs a process that checks whether participants have a paid subscription.
- For all those who have not renewed their subscription, a special bot is launched from the GetCourse process in BotHelp.
- This bot excludes such subscribers from a closed chat/group in Telegram.
Setting up a funnel in BotHelp
1. Creating and configuring a bot
- Create a bot for a telegram channel.
- Add an Action block.
- Select the action type "Exclude from group/channel".
- Please enter the ID of your closed group from which you want to remove the subscriber.
- For more detailed instructions on working with groups and channels in Telegram, please follow the link .
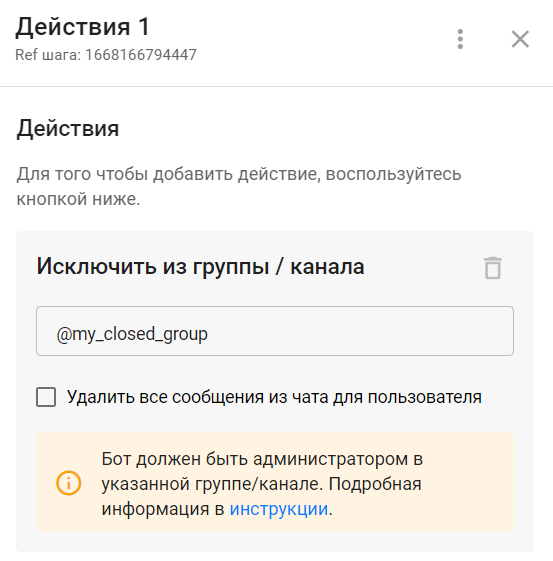
- If necessary, you can send a message or add a tag.
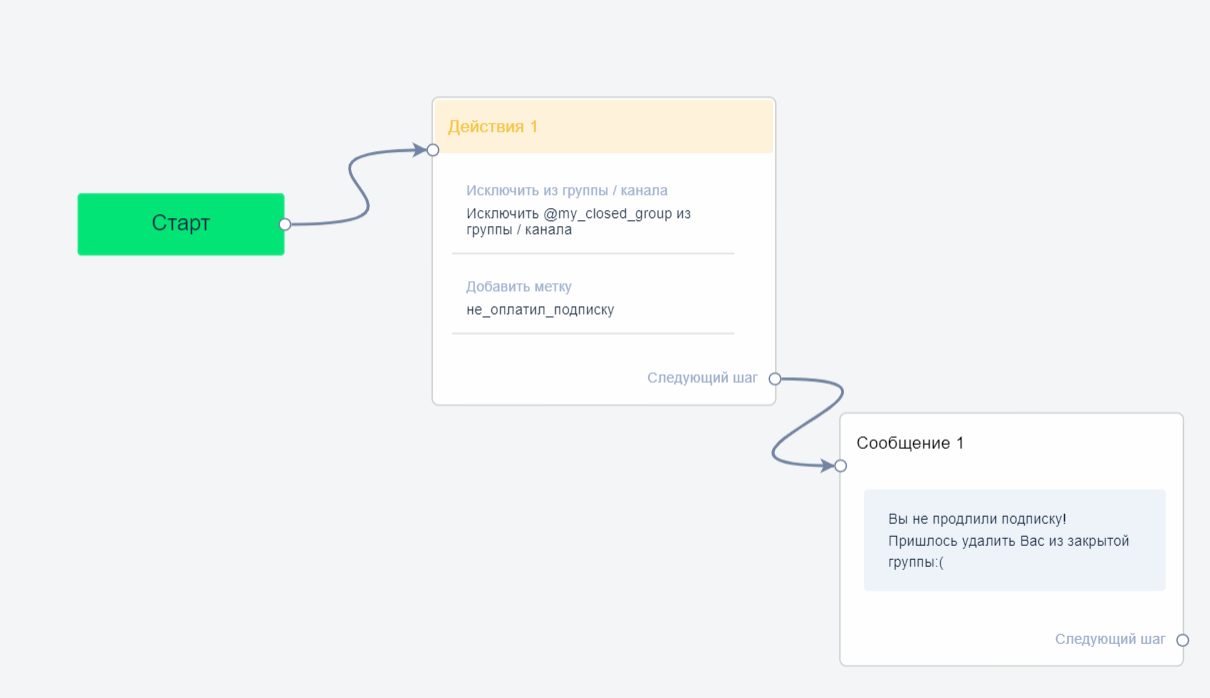
- The result is a simple bot like this:
2. Obtaining data for further integration setup
To further configure the integration, you will need:
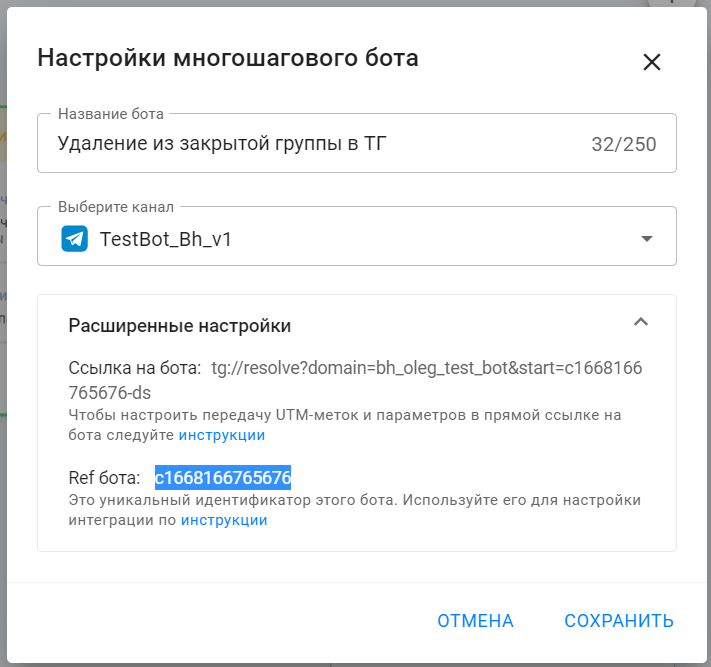
- Get the Ref of the created bot.
- Stay in the currently open window - the bot editor.
- Click on the settings button, the gear, in the upper right corner.
- Click on the sub-item "Settings".
- In the window that opens, expand “Additional settings”.
- At the very bottom of the window that opens, find the field called “Bot Ref” — the identifier of this bot.
- Copy/write it down. It will come in handy later.
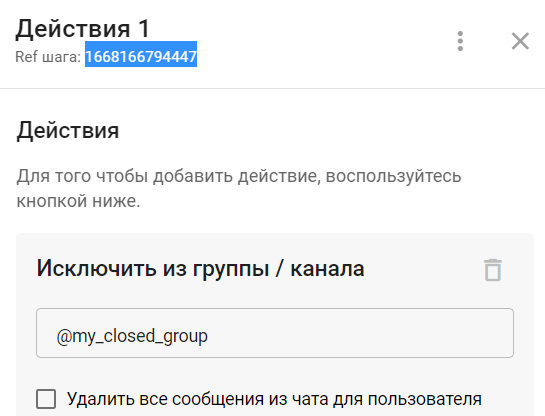
- Get Step Ref.
- Stay in the currently open window - the bot editor.
- Go to bot editing mode by clicking Edit in the upper right corner.
- Open the editing panel of the first step of the created bot.
- In our example, this is the step "Action 1".
- The step ref is displayed at the top of the panel under the step name - this is the ID of the current step.
- Copy/write it down. It will come in handy later.
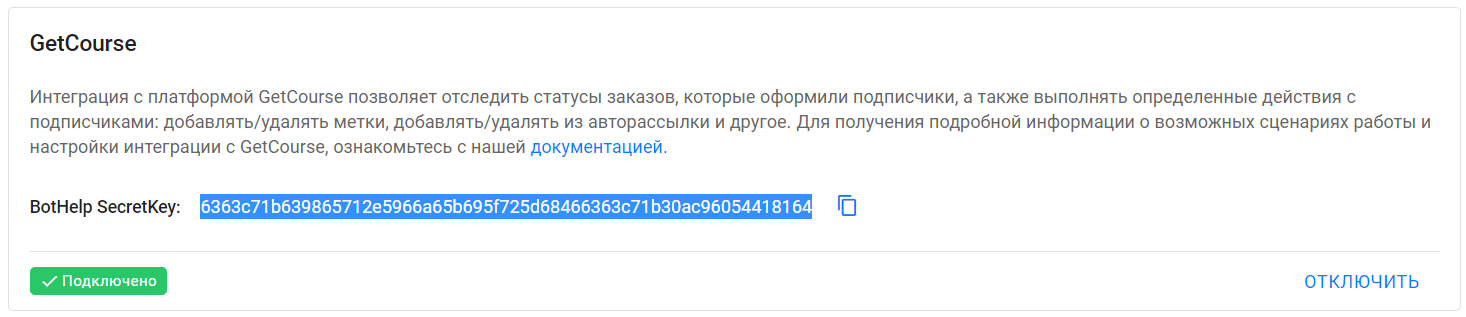
- Get BotHelp SecretKey.
- Go to the "Settings" section in the navigation panel of your account.
- Open the Integrations tab.
- Find the GetCourse block and click the Add Integration .
- Copy/write down the received BotHelp SecretKey. It will be useful later.
Setup steps in GetCourse
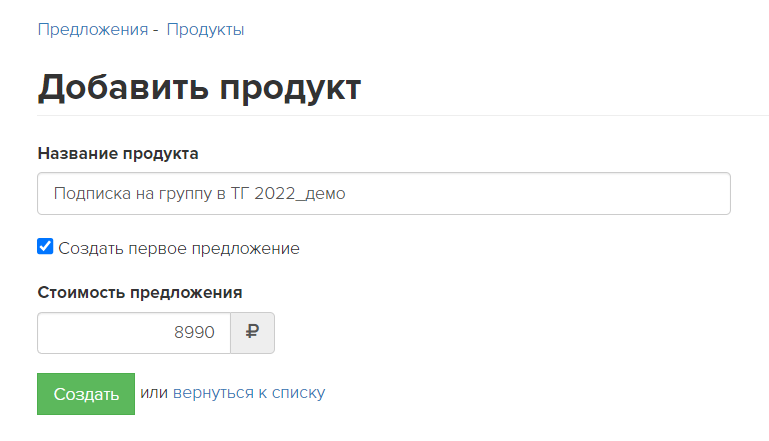
1. Product creation
- Go to the Sales - Products section and click the Add Product .
- Give the product a name.
- Set the price of the offer.
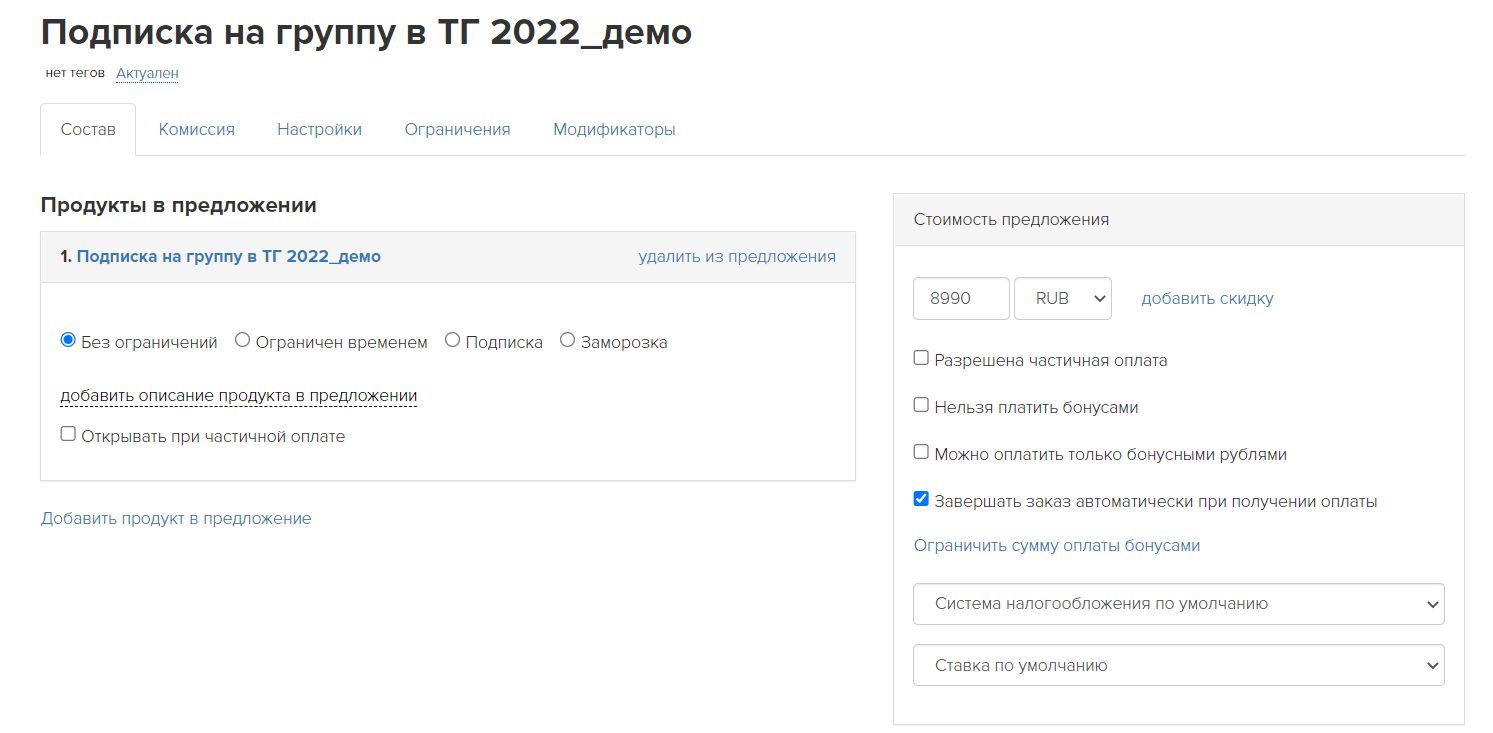
- After saving the product, go to the Offers tab and open the created offer (its name matches the product name).
- Make sure that the offer has the "Complete order automatically upon receipt of payment" checkbox enabled.
- For this offer, orders will automatically move to the "Completed" status once payment is received.
2. Creating a process
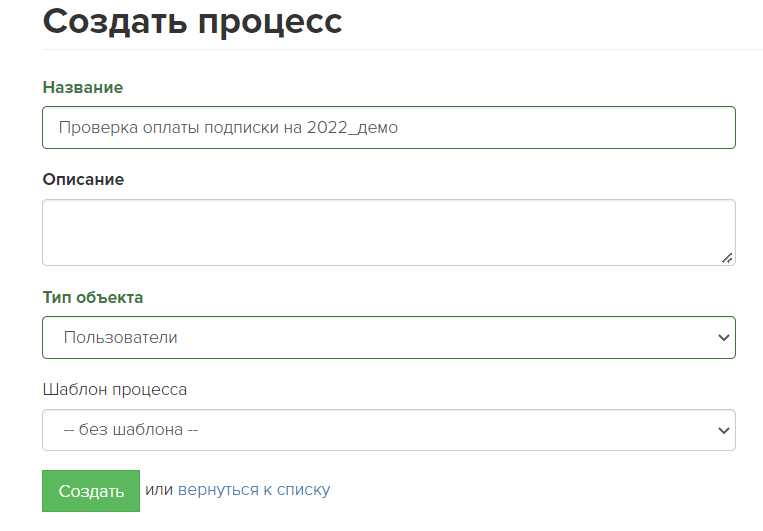
- Go to the "Tasks" - "Processes" section and click on the Create process .
- Please specify the name of the process.
- Select the object type "Users".
- There is no need to specify anything in the “Template” field; leave the “no template” option.
- Click the Create .
3. Setting up the process
- In the settings of the created process, in the "Bulk task creation" section, select the "One-time after launch" option.
- In this case, the created process will be launched only once - immediately after launch.
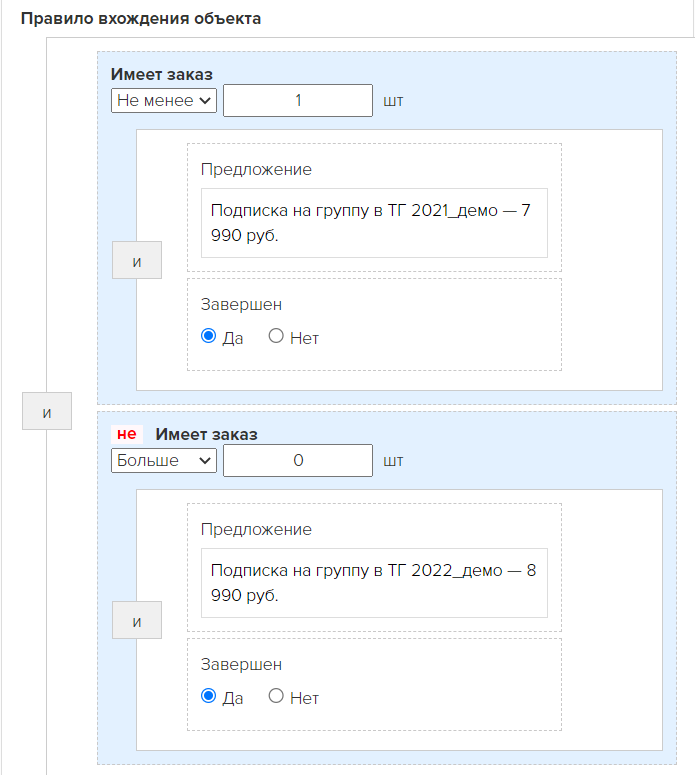
- In the object entry rules, set the following logic:
- The user already has a paid subscription for the previous period.
- The user does not have a paid subscription for the current period.
4. Creating process logic
- In the settings of the created process, go to the "Process" tab to configure the logic of the process itself.
- Add the Operation block.
- Please specify the block name.
- The block must work according to the User.
- Select the operation type "Call URL".
- In the block settings you need to select the “POST” method.
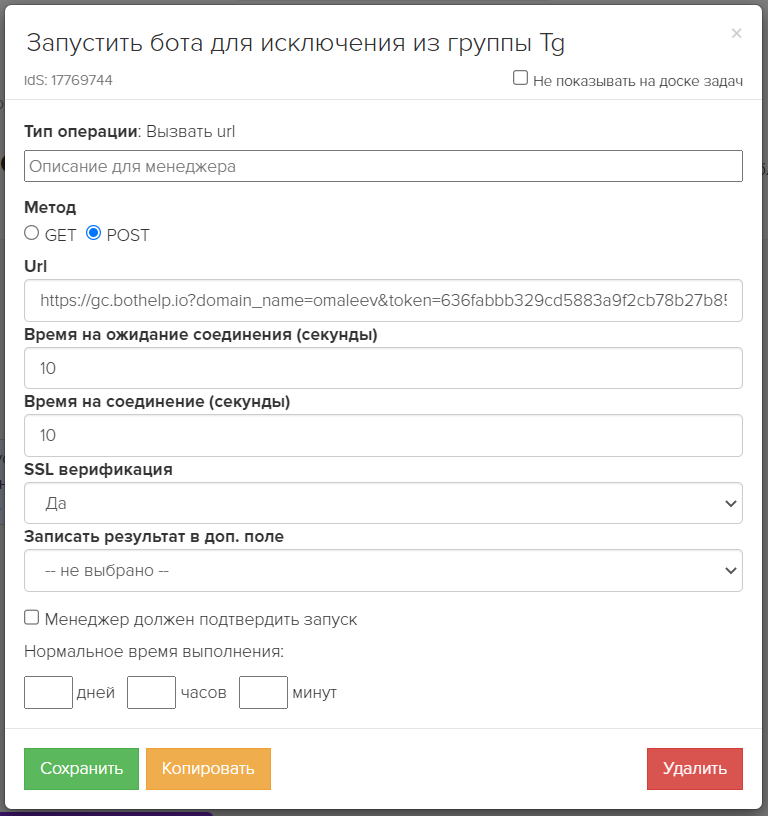
- In the URL field you need to insert the link:
https://gc.bothelp.io?domain_name={%Your domain in Bothelp%}&token={%Your SecretKey from BotHelp account%}&email={object.email}&phone={object.phone}&actions[run_bot]={%Ref of your bot%}&actions[step_ref]={%Ref of your bot step%}
- Important!
- In the field
domain_nameinstead of the text {%Your domain in Bothelp%} you need to specify the domain of your account in BotHelp. Curly brackets {} and % signs need to be removed. The final entry will be in this format:domain_name=mybhaccount. - In the
token, instead of the text {%Your SecretKey from the BotHelp account%}, you must specify the BotHelp SecretKey from the integration settings of your account (see the first section of this manual). Curly brackets {} and % signs must be removed. The final entry will be in this format:token=qwerty123456. - In
the actions[run_bot], instead of the text {%Ref of your bot%}, you must specify the Ref of the bot to which you want to add a subscriber (see the second point of this instruction). Curly brackets {} and % signs must be removed. The final entry will be in this format:actions[run_bot]=c123456789. - In
the actions[step_ref], instead of the text {%Ref of your bot's step%}, you must specify the Ref of the bot step to which you want to add a subscriber (see the second point of this instruction). Curly brackets {} and % signs must be removed. The final entry will be in this format:actions[step_ref]=f987654321. - Example of a ready link:
- In the field
https://gc.bothelp.io?domain_name=mybhaccount&token=qwerty123456&email={object.email}&phone={object.phone}&actions[run_bot]=c123456789&actions[step_ref]=f987654321
- What is this link for?
- With this link, GetCourse sends data about the subscriber and the action type so that BotHelp can perform the specified action on the selected subscriber.
- This link specifies the necessary data about the subscriber and the action:
- email — subscriber's email. BotHelp uses it to find a specific subscriber in its database. This is a required field when identifying by email.
- domain_name — the name of your account in BotHelp. This field tells BotHelp in which account to look for a subscriber with such email. This is a required field.
- token — the secret key of your BotHelp account, which ensures the security of the integration. This is a required field.
- phone — subscriber's phone. BotHelp can also use it to find a specific subscriber in its database if there are several of them by email. This is an optional field.
- actions[run_bot] And actions[step_ref] — parameters that designate the command "Add to the bot for a certain step". The parameter values indicate the identifiers of the bot and its step to which the subscriber needs to be added.
- actions[run_bot] is a required field.
- actions[step_ref] — optional field. If this parameter is not present, the bot for the subscriber will be launched from the "Start" step.
- Save this block.
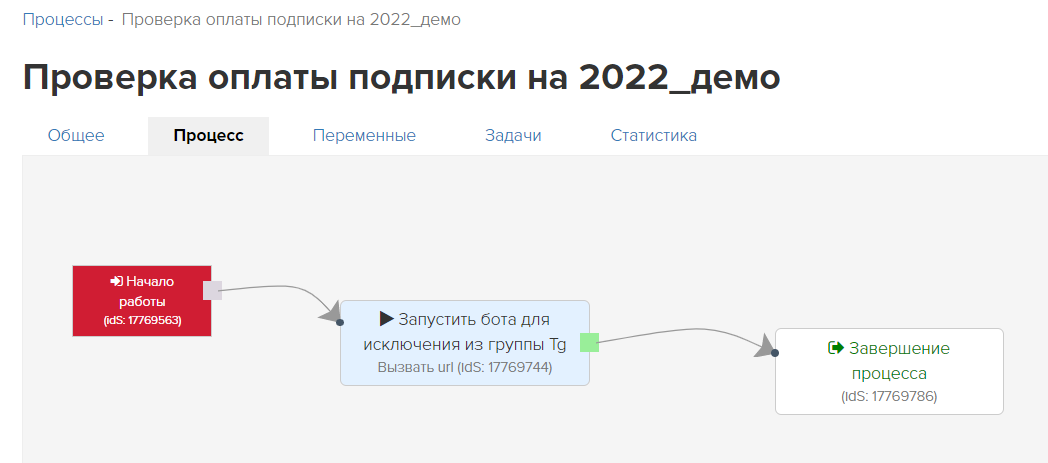
- Add a "Process Completion" block and draw links between the blocks.
- The final process should look like this:
- Done! On the "General" tab of the created process, activate the "Approved" checkbox.
- When ready, click the big green Run - the process will start and run once.
If you have not found the answer to your question, ask us in the chat inside your account or write to BotHelpSupportBot or to hello@bothelp.io
Get 14 days of full functionality of the platform for creating mailings, autofunnels and chatbots BotHelp.