The VKontakte pixel allows you to track all visitors who have visited your landing page, clicked on a button, or performed other actions.
BotHelp supports VK pixel from the new VKontakte advertising profile ads.vk.com
Setting up a pixel in the old profile
Creating a pixel
- Log in to your VKontakte advertising profile and go to the “Retargeting” tab.
- Go to the “Pixels” tab.
- Click on the Create Pixel link.

Allowed domain
When creating a pixel, you have specify the domain of the site which the data will be transmitted from.
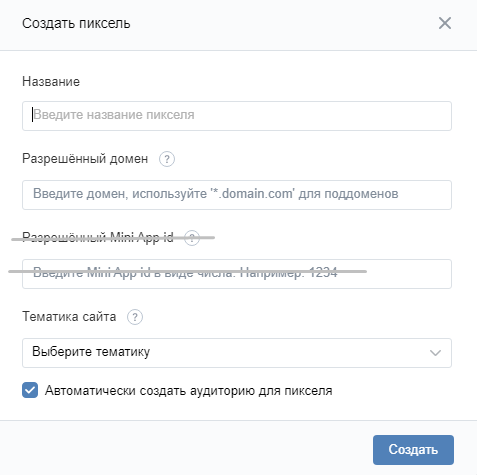
Please note that you have to specify different domains for mini-landings and VK landings.:
- For VK landing — domain landing.whatshelp.io
- For a mini-landing — domain mnlp.cc

Allowed Mini App id — skip without entering data.
This option is relevant for those who have developed their own application for VKontakte and want to collect information about the audience from this application.
Connecting a pixel to a landing page
After creating it, you will see the script code, you don’t need it.
You only need the code that allows you to receive JavaScript events. Copy it.
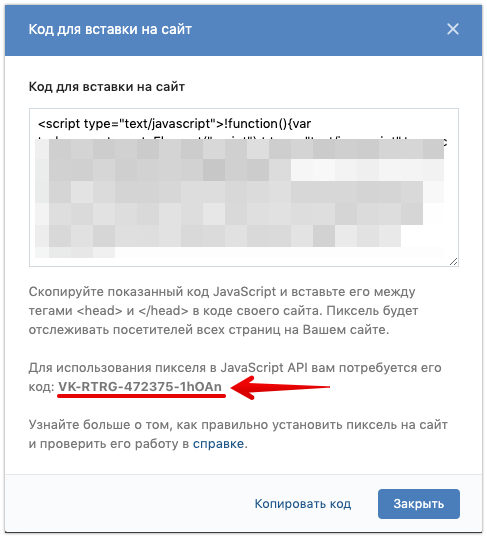
Go to the landing page settings and click on the Add VK Pixel checkmark.
Paste the pixel short code into the input field and click Save.

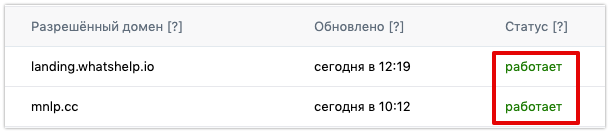
Testing
❗After connecting the pixel, be sure to go to the landing page, click on the button and start the chain.
It is necessary that several people besides you go to the landing page and start the chain. Then the data will arrive and the pixel status will change to “running”.
After that, proceed to setting up the audience.
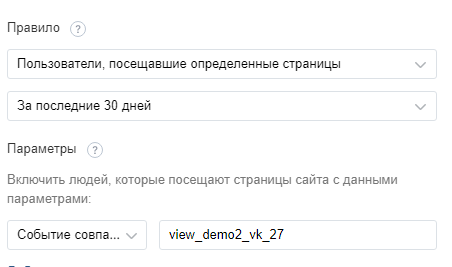
Creating retargeting audience
We will set up retargeting audiences to which users will be added after certain events.
- Log in to your VKontakte advertising profile and go to the “Retargeting” tab.
- Go to the “Audiences” tab.
- Click on the Create Audience link.

4. In the “Source”, select “Get via pixel”.
5. Select the pixel for which you want to create an audience.
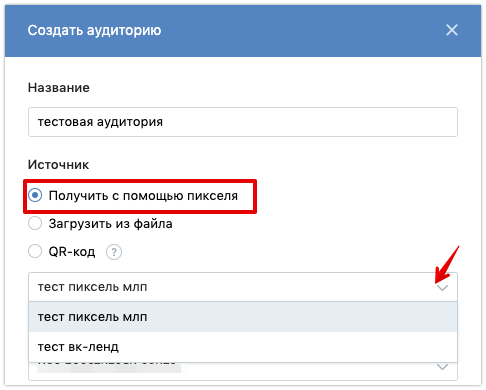
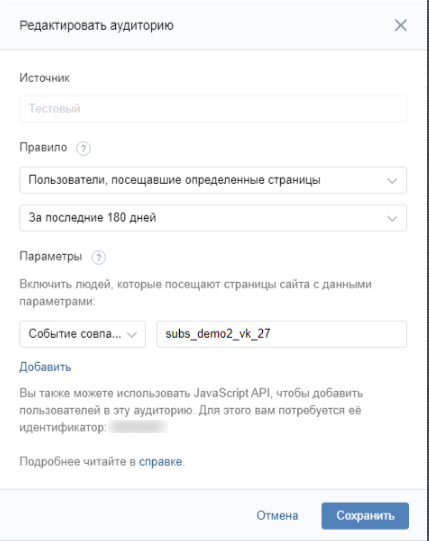
When creating an audience, select the rule “Users who visited certain pages”, select “Event matches” in the parameters and specify the event name.
Setting up a pixel in a new profile
Creating a pixel
- Log in to your advertising profile ads.vk.com and go to the “Sites” tab.
- Click the “Add Pixel” button.
- In the window that opens, paste the link to your mini-landing page.
- In the next window, select “Create new pixel” to create a new VK pixel for the specified site.
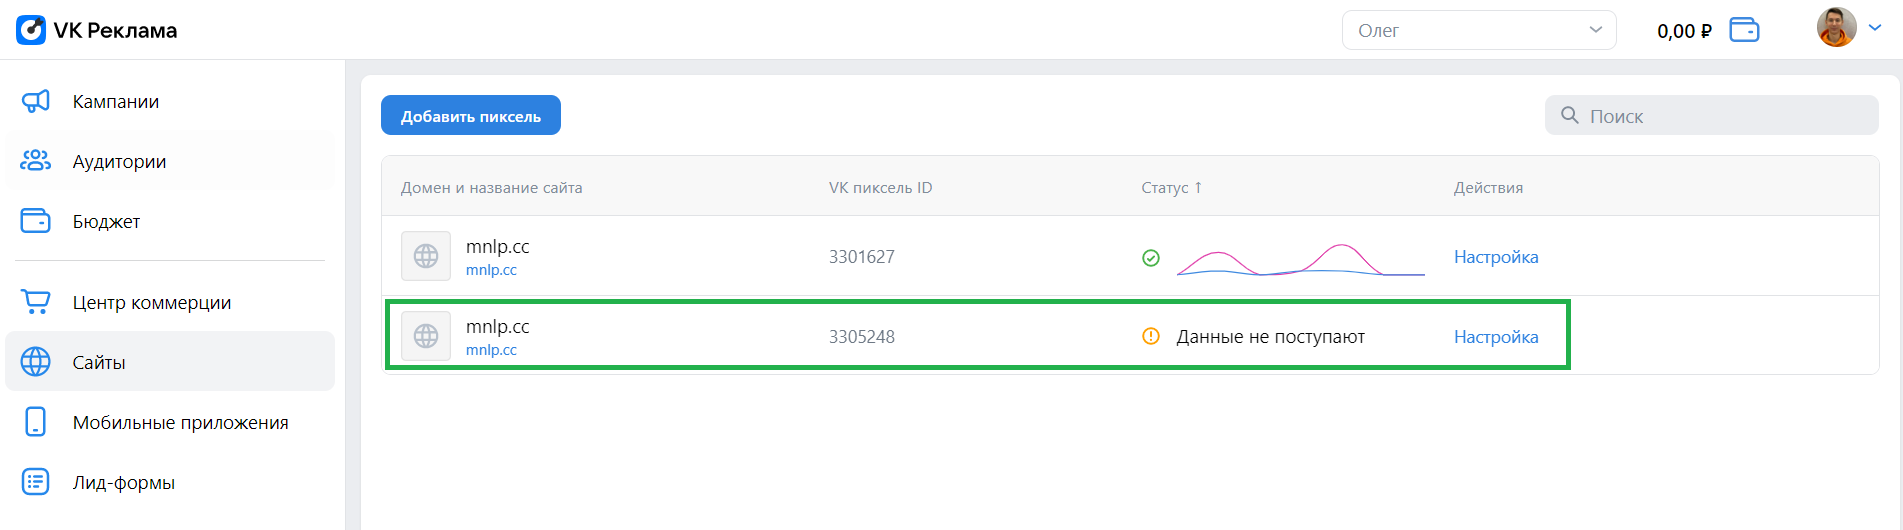
- After that, your website and the pixel created for it should appear in the “Sites” profile.
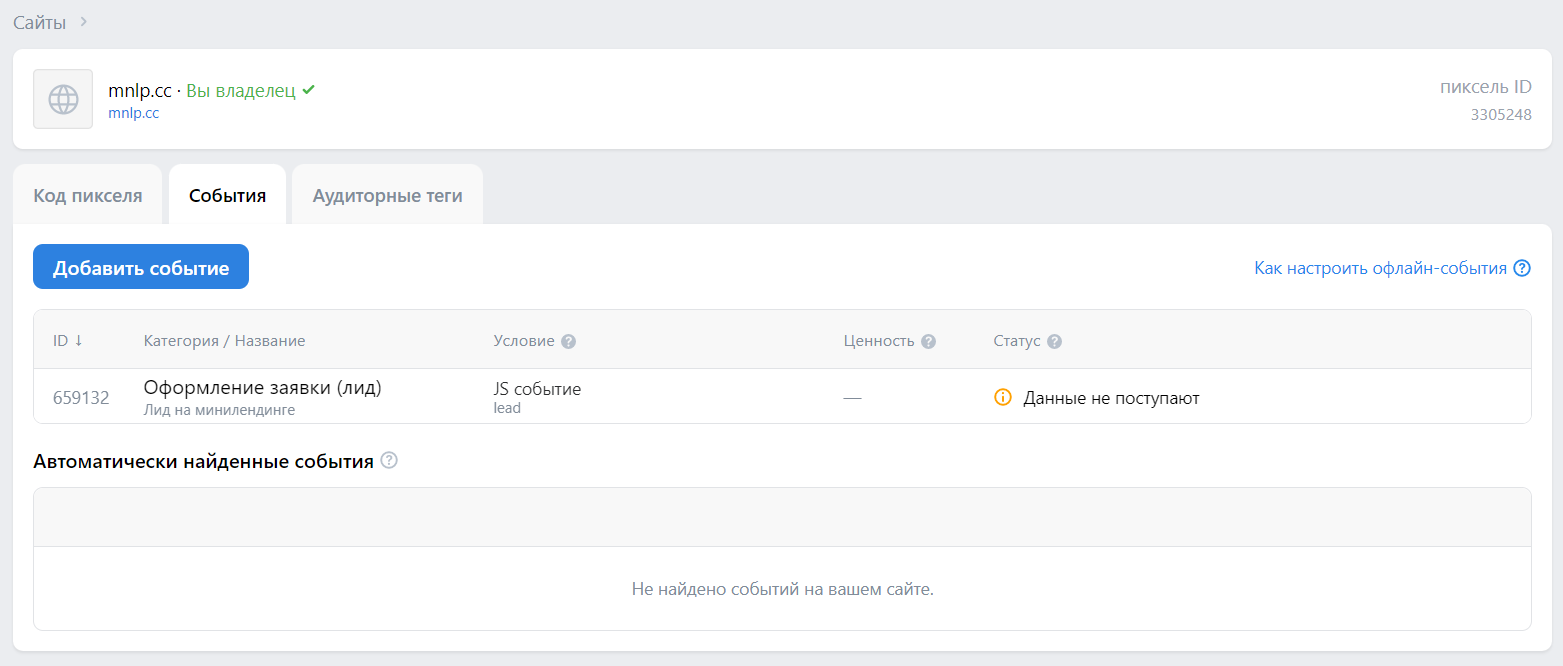
Creating events
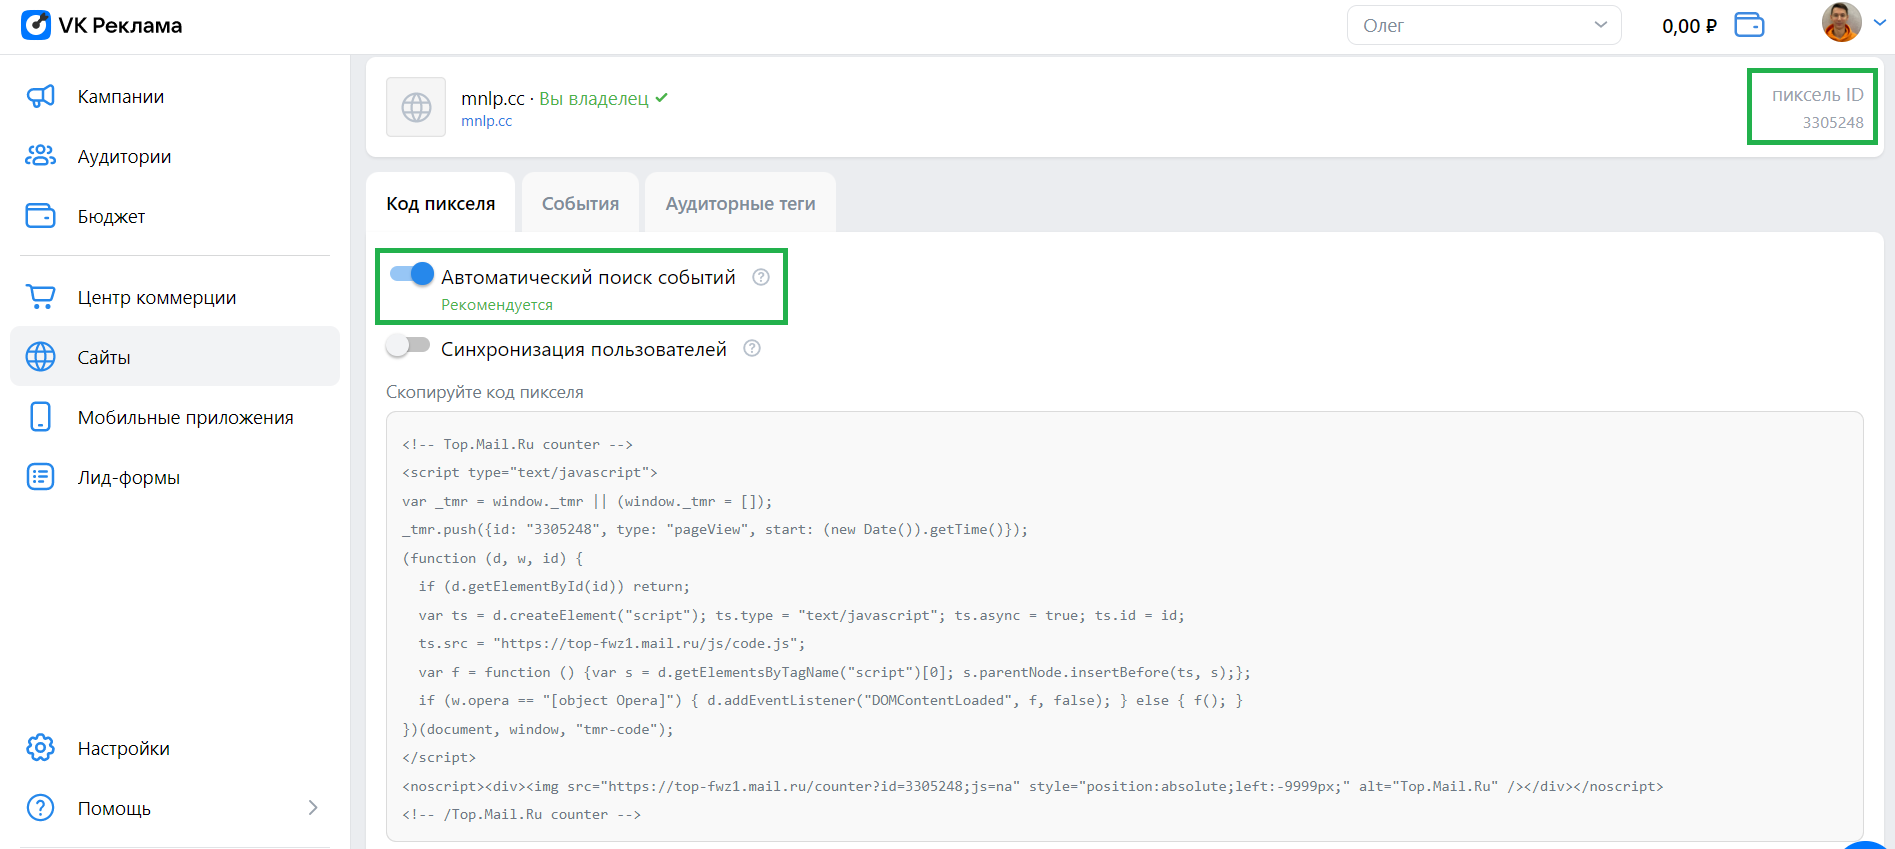
- To proceed to the creation and configuration of events that should be transmitted, click the Settings button in the “Actions” column.
- In the section that opens, activate the “Automatic event search” option, and also copy the ID pixel in the upper-right corner. Later, you will have to insert it in the settings of your mini-landing page in the BotHelp profile.
- Go to the “Events” tab and click the Add Event button.
- Create a “lead” event. To do this:
- in the “Category” field, select the “Application form (lead)” option;
- enter the name;
- in the “Condition of occurrence” field, be sure to select the “JS event” option. You will have to specify the same value for other events that you will create in the new VKontakte advertising profile;
- in the “Target name” field, type “lead”. This is an event that is preset in your BotHelp profile. For a complete list of available events, see the next section — “Events”.
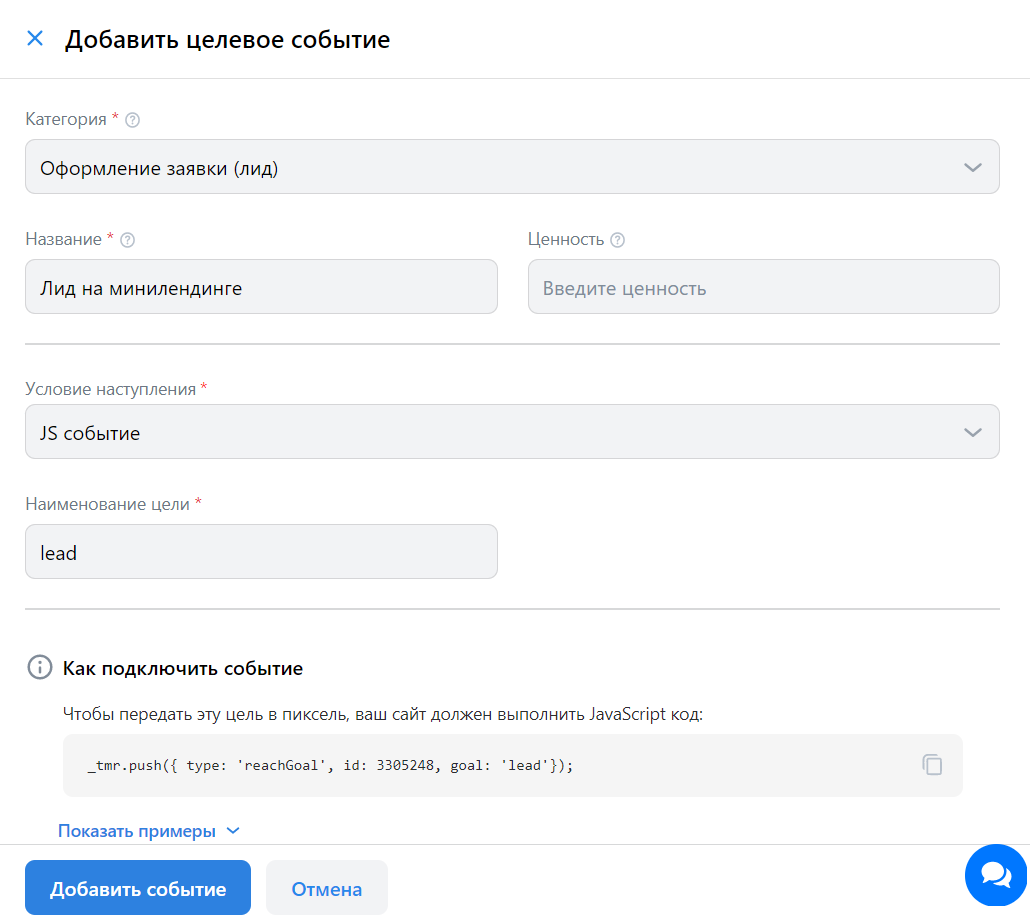
- Click “Add Event”. After that, it should appear in the list of your events.
Connecting a VK pixel to a landing page
- Go to the edit page for your landing page in the BotHelp profile.
- In the “Advanced Settings” section, activate the “Add VK Pixel” option.
- In the text field that appears, specify the pixel ID from your VKontakte advertising profile.
- IMPORTANT! You don’t have to specify anything else to connect the VK pixel, including the JavaScript pixel data from the VKontakte advertising profile.
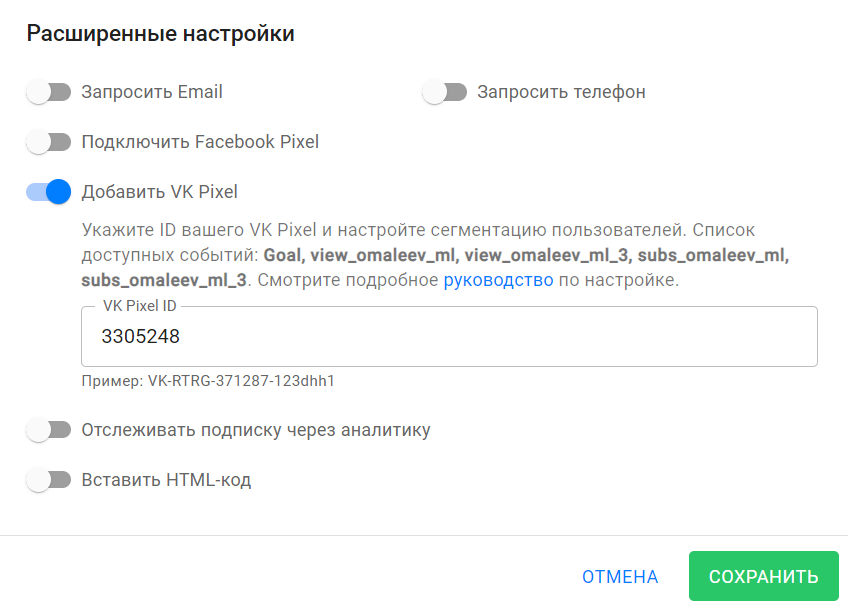
- Click Save.
- Done! The VK pixel is connected to your mini-landing page.
- IMPORTANT! The VKontakte advertising profile needs time for the event data to arrive. During this time, the created pixel will display the message “Data not received” in the “Status” column.
For VK landing page
| Event | Description |
|---|---|
| view_account-name_vk | Viewing any VK landing page in the “account-name” profile |
| view_account-name_vk_XXX | Viewing VK lending with the “ХХХ” ID in the “account-name” profile |
| subs_account-name_vk | Subscribing to any VK landing in the “account-name” profile |
| subs_account-name_vk_XXX | Subscribing to VK landing with the “XXX” ID in the “account-name” profile |
| unsubs_account-name_vk | Unsubscribing from any VK landing page in the “account-name” profile |
| unsubs_account-name_vk_XXX | Unsubscribing from VK landing page with the “XXX” ID in the “account-name” profile |
| lead | Click on the button |
For a mini-landing page
| Event | Description |
|---|---|
| view_account-name_ml | Viewing any mini-landing page in the “account-name” profile |
| view_account-name_ml_XXX | Viewing a mini-landing page with the “XXX” ID in the “account-name” profile |
| subs_account-name_ml | Subscribing to any mini-landing page in the “account-name” profile |
| subs_account-name_ml_XXX | Subscribing to a mini-landing page with the “XXX” ID in the “account-name” profile |
| lead |
Click on the button
|
How to collect all the landing page visitors
To do this, go to the old profile in the audience settings:
— select the rule “Users who visited certain pages”,
— select a time period from 3 days to 2 years,
— select “Event matches” in the parameters,
— enter the event name.
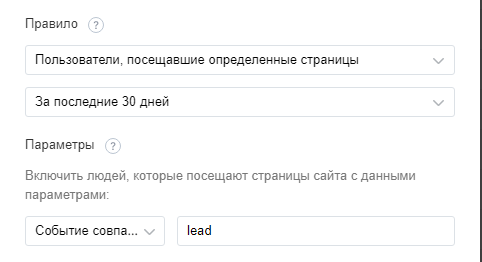
If you want to collect only those who clicked on the button on the landing page, then set the rule in the audience settings:
—”Users who visited certain pages”,
— select a time period,
— select “Event matches” in the parameters,
— enter the “lead” event.
After you have more than 100 people, you will be able to set up your ad for this audience.
How to segment the audience in a new advertising VKontakte profile into those who visited the page and those who clicked the button?
You have to create a separate audience:

Section “Audiences” — “Create” — select a source — configure which events to include, which to exclude — “Create Audience”.
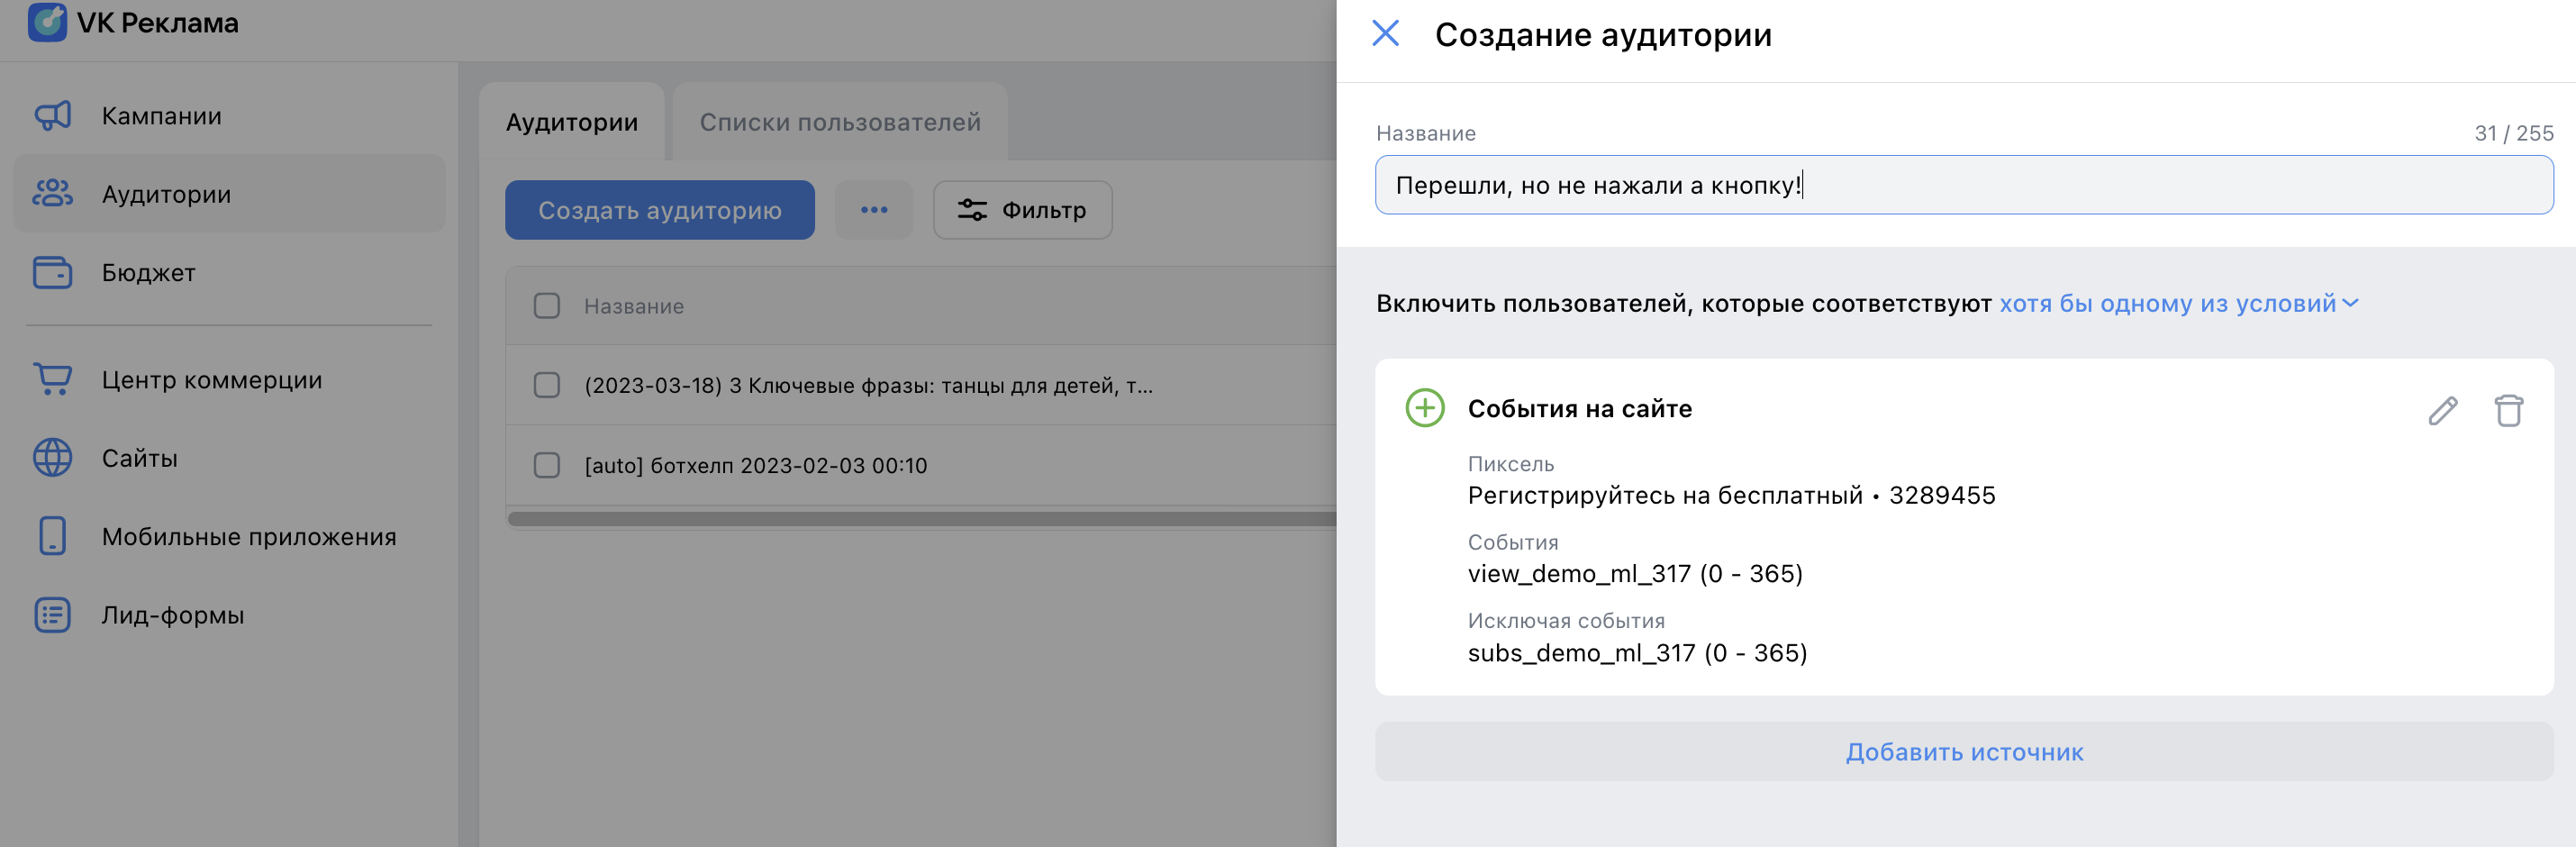
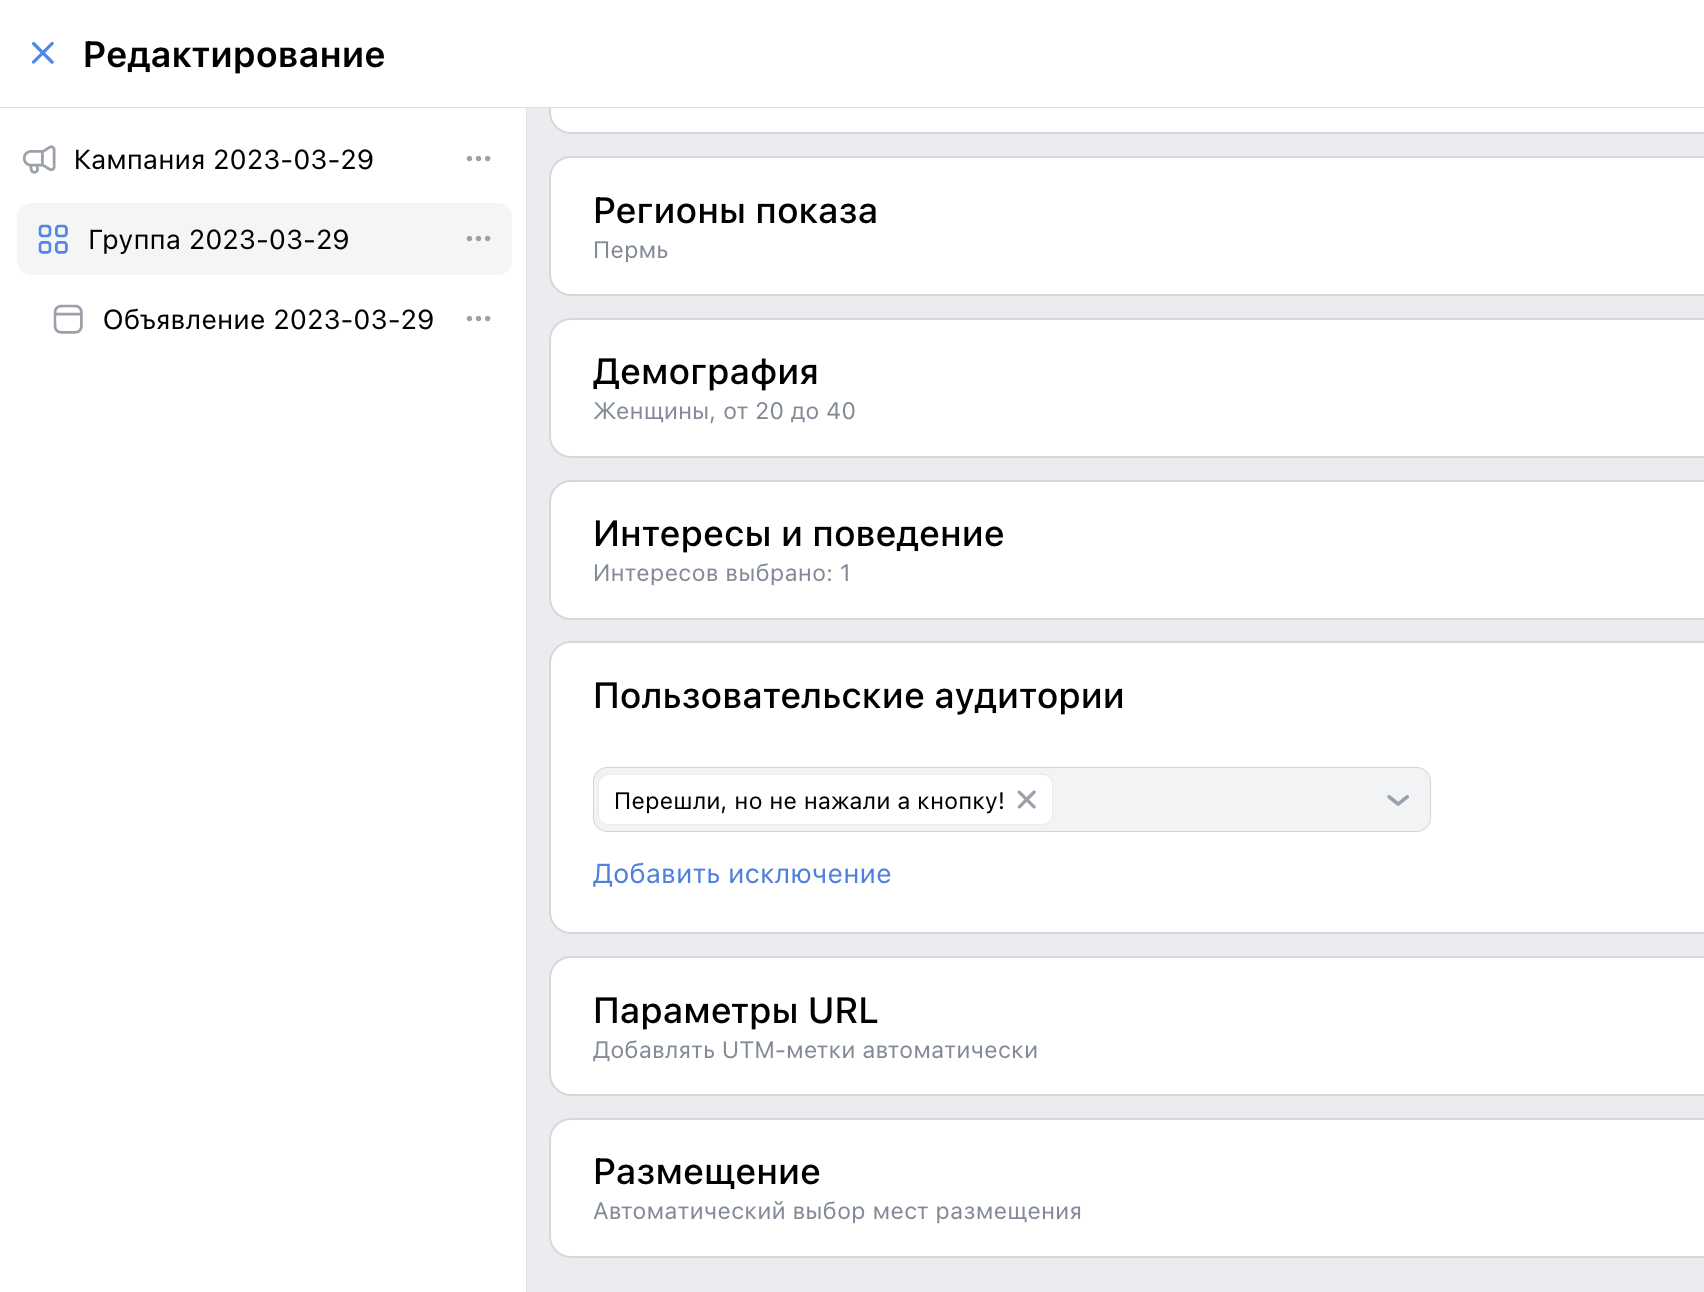
Then you can select this audience in the advertising settings, in the “User audiences” section.
If you haven’t found the answer to your question, contact us in the chat in your profile or email hello@bothelp.io😃
Get 14 days of full functionality of BotHelp, a platform for creating broadcasting, autofunnels, and chatbots.
Была ли статья полезна?
Спасибо за обратную связь!