
Saved Filters let you save a set of subscriber filter conditions under a custom name, so you can quickly reuse the same segmentation in the Subscribers section and when creating broadcasts.
What Saved Filters Can Do
- Store the entire set of subscriber filter conditions, including all filter types, AND/OR logic, and nested groups.
- Are available at the workspace level. Any user with access to the Subscribers section can use them, regardless of who created them. Saved filters are not shared across workspaces.
- Have no limit on the number of filters you can create.
- Can be used both in the Subscribers section and when selecting the audience for a broadcast.
Important: You cannot save an empty filter with no conditions.
How to Save a Filter
- Go to the Subscribers section.
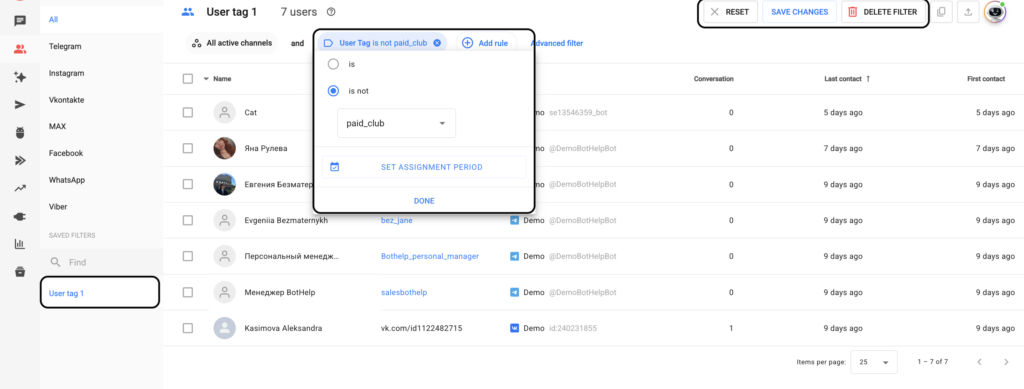
- Configure the required filter conditions in the Filters panel:
- Select rules and values.
- Add AND or OR conditions.
- Create nested groups if needed.
- Click Save Filter.
- Enter a name for the filter and confirm.
The saved filter will appear in the workspace’s list of saved filters and become available in both Subscribers and Broadcasts.
Filter Name Requirements
- Must be 2–50 characters long.
- May contain Latin or Cyrillic letters, numbers, spaces, and common punctuation.
- Emojis and special characters are not supported.
- The name cannot be empty.
- The name must be unique within the workspace. Names that differ only by letter case are considered duplicates.
Available Actions
Each saved filter supports the following actions:
- Apply — Restores all filter conditions in the Subscribers section.
- Edit — Updates the filter conditions and saves them to the same filter.
- Duplicate — Creates a copy so you can modify it without affecting the original.
- Delete — Removes the filter from the workspace. Confirmation is required.
After deletion, the filter is removed from both the Subscribers and Broadcasts sections.
Applying a Filter in the Subscribers Section
- Open the Filters panel.
- Select a saved filter.
The saved conditions are restored automatically, and the subscriber list and matching subscriber count are updated.
You can switch between saved filters at any time without confirmation.
If no subscribers match the selected conditions, the list will be empty and the subscriber count will be 0.
After applying a filter, you can modify its conditions manually. These changes do not update the saved filter unless you explicitly choose Edit and save the changes.
If a filter contains a deleted tag or deleted custom field, the filter can still be applied. Invalid conditions are ignored, while all remaining valid conditions continue to work.
Using Saved Filters in Broadcasts
You can select a saved filter when choosing the audience for a broadcast.
The filter conditions are copied into the broadcast, and a preview shows the estimated recipients and recipient count.
Broadcast Behavior
- The audience is calculated at the time of sending. For example, if a subscriber receives a matching tag before the broadcast is sent, they will be included.
- If the filter contains conditions for multiple channels, only the conditions relevant to the selected broadcast channel are applied.
- If no subscribers match the conditions when the broadcast is ready to send, the broadcast is not sent, and the Refine Segmentation status is displayed.
- The filter conditions are copied into the broadcast when it is created. If the original saved filter is later edited or deleted, the broadcast’s audience conditions remain unchanged.
Permissions
Users with the Administrator, Editor, or Analyst role can create, edit, duplicate, delete, and apply saved filters in both the Subscribers and Broadcasts sections.
Users who only have access to Conversations cannot view or use saved filters. The filter list and Save Filter button are not available to them.
For more information about configuring filter conditions, see the Subscriber Filtering article.
You can also export filtered subscribers, and learn more about broadcasts in the One-Time Broadcast Overview and Multichannel Broadcast articles.
If you can’t find the answer to your question, contact us via the in-app chat or email us at hello@bothelp.io.
Get 14 days of full access to BotHelp and explore all platform features for broadcasts, automated funnels, and chatbots.
Sign up for BotHelp
Get 14 days of full access for free — enough to build your first bot and test it on real subscribers.
Create account
Была ли статья полезна?